Partition a disk in Windows 7 it is possible using the built-in Disk Management utility; this is very convenient to do and there is no need to resort to third-party programs, so-called partition managers, for example Acronis. But to be honest, in particularly interesting cases that novice users like to find themselves in, as well as when installing several operating systems, you still can’t do without these programs. To show you everything clearly, I installed an additional hard drive in my system unit and on it I will show you how...
Partition a disk in Windows 7
What prompted me to write this article was a letter from our visitor, which I received in the mail.
- "Hello. I read your articles and set the Seven myself, can you imagine, but I was just worried and forgot split the disk into before installing on two partitions, one for the operating system, the other for my personal data, you have articles on your site, but I understood them for Windows XP, but what should I do?”
So we launch our program: Start->Computer->Management,

in this window you can see all the information about the hard drives connected to your computer. Using the capabilities of the Disk Management program, we can not only Partition a disk in Windows 7 into two or more partitions, but also increase the size of volumes, compress them and delete, attach, in general, such things can be done without the appropriate knowledge, so let’s be careful.
In the program window Disk management You can see that I have three hard drives.
Disk 0 is the first hard drive, the countdown does not start from one, but from zero, remember. Its volume is 232.88 GB.
Disk 1->second hard drive in the system, its capacity is 465.76 GB
Disk 2->third hard drive, with a capacity of 232.88 GB, you can notice its size is the same as the first one.

We will carry out all operations with disk number 2, that is, with the third, most recent one. The most important thing is that Disk 2 is not empty, there are files on it and not just that, but the Windows 7 operating system, I have two of them, nothing should happen to it during our actions and all the files will remain intact and it will load.

First, divide the disk into two parts, point the mouse at Disk 2 and right-click on the volume in the drop-down menu, select Shrink Volume,


Program response Space available for compression->222361 MB, or approximately 217 GB.
Next, we need to indicate how much we will compress -> Size of compressible space figure 222361 MB, or 217 GB,

If we now agree and click Compress, the size of the first volume with the operating system will turn out to be very small. The total size after compression is -> 16112 MB or 15 GB.

Therefore, for example, I will make two volumes approximately the same and indicate the size as 115361 MB or 112 GB, as you can see it changed immediately Overall size after compression to the number 123112 MB or 120 GB, that is, our disk (D:) after compression will be 120 GB in size, and the unallocated space for the new partition will be 112 GB.

This suits us, click Compress. A short process of compressing the partition occurs, you will notice that the work is pleasant and easy. The job is done and unallocated space has appeared, which we will convert into a simple volume.
A hard drive is designed to permanently store information used when operating a computer. They are also called hard drives or hard drives. The abbreviation HDD also stands for hard drive in computer terminology. A hard disk is one of the fastest devices for writing and reading information, not counting RAM.
Most often, it is not convenient to use a hard drive as a single storage of information, so most users of PCs and laptops split the hard drive into partitions for convenience.

The concept of a hard drive partition
A partition (often referred to as a volume) is an area of a hard drive that can be formatted for a specific file system. A partition or volume is designated by a letter of the Latin alphabet, for example F, E, H, Z, or other letters that are not currently used on this hard drive.
Type of computer hard drive
Types of hard disk partitions
Experts in modern computer terminology related to hard drive partitions distinguish three main types of volumes on a hard drive:
- Primary (Primary partition);
- Extended partition;
- Logical partition.
The primary hard drive partition typically stores user data, programs, and operating system files. There can be more than one primary partition on a hard disk, but there cannot be more than four. It is impossible to install more than one operating system on one primary hard drive volume, so if you want to use several operating systems on one PC, split the hard drive into several partitions. And since there cannot be more than four primary partitions on one hard drive, there cannot be more than four installed operating systems either.
During each session of working with a computer, only one primary partition is active, the one from which the operating system was loaded. Many operating systems have the ability to boot only from the active volume on the hard drive.
An extended partition combines logical drives, which are also called logical partitions. You can create a huge number of logical disks in an extended partition. They can store various information, such as user data, applications, programs, personal photos, videos and documents, even operating system files that can be loaded not only from the primary partition.
Logical partitions are almost no different from extended partitions. Any logical drive is simply an area of an extended partition.
Computer hard drive
Partitioning your hard drive
Many owners of laptops and personal computers, after purchasing, think about the problem of dividing the hard drive into partitions. The essence of this partition is to divide the computer's hard drive into two or more partitions. In most cases, they create a local drive C containing the operating system and system folders, as well as a local drive D on which they mainly store their favorite movies, music, photos, text documents, etc. But for storing personal data, not one, but several local drives can be used and They can be named by any letters of the Latin alphabet.
Hard disk division occurs only formally
Advantages of partitioning your hard drive
Splitting your hard drive into several partitions has many advantages. For example, the most significant advantage of this procedure is that personal files such as videos, photographs and documents will be stored on a separate disk. Because if the need arises to reinstall the operating system, and formatting the disk with the OS is simply inevitable in this case, then all your personal files and folders will be saved.
There is, of course, another solution to this problem. Before reinstalling the operating system, move all important data to removable media, but this is quite a labor-intensive task, especially if the amount of information that needs to be saved is tens or even hundreds of gigabytes. And if a situation arises when an emergency reinstallation of the operating system is necessary, access to personal files saved on a shared local drive along with the OS is no longer possible, important information will simply be lost.
This is what a computer's hard drive looks like when purchased in a store.
Storing system and personal files in different sections of the hard drive will be more convenient. It will be easier to find the information you are interested in, since each section will be less cluttered, and you will easily find the necessary files or folders. In addition, the obvious advantage of partitioning a hard drive is that it is easier for the operating system to work with a less loaded partition, that is, the performance of the OS increases significantly.
Another advantage of dividing a hard drive into partitions is the ability to use several operating systems on one computer. For example, Windows 7 and Windows 8 or Windows XP can be installed on one hard drive, but for this the hard drive must be partitioned. If a failure occurs in one of the operating systems, you will have another operating system installed and ready to use.
To summarize, it is worth highlighting the main advantages of dividing a hard drive into partitions. So, the advantages of this procedure include:
- ensuring the security of personal data even if failures occur in the OS;
- high efficiency of organizing information stored on the hard drive;
- increased OS performance due to less partition load;
- the ability to install and use several operating systems on a computer.
A hard drive is a very complex device that provides quick access to stored information.
Dividing a hard drive into partitions using built-in Windows OS tools
Since we have found out the main reasons why a hard drive is partitioned and become familiar with the main advantages that such a solution subsequently brings, we should consider in detail how to partition a hard drive into local disks in practice. Moreover, we will describe the algorithm for performing this procedure in relation to the most popular operating systems - Windows 7, 8 and 10.
Partitioning a hard drive in Windows 7
If your computer or laptop has the Windows 7 operating system installed, then to divide the hard drive into partitions, follow these steps:
Step 1. Right-click on the “Computer” icon on the desktop or in the “Start” panel, open the context menu, and click “Manage.”
Right-click on the Computer icon
Step 2. In the window that opens, select the “Disk Management” utility from the menu. After this, you will have to wait for a few seconds until a window with the hard drive structure opens.
Select Disk Management
Hard disk partitions
Step 3. To partition the hard drive, you need to select a volume that has a fairly large space, but it is worth remembering that it is better to compress a non-system partition if possible. Right-click on the selected volume and select “Shrink Volume” from the context menu. A small window will open and you will still need to wait some time.
Select Shrink disk and wait a few seconds
Step 4. The system will offer available compression options. Maximum values will be indicated, but it is not recommended to use them, so reduce the size a little to the level required for you. This will be the size of the future logical disk. Enter the required values in the boxes and click on the “Compress” button. Next, we wait again until the compression process is completed.
Maximum allowed values for volume compression
Step 5: Once the process is complete, a new partition will appear in the Disk Management window. A black stripe and the inscription “Not distributed” will be visible on the top of it. To convert it into a hard disk volume, right-click, then select “Create simple volume”.
Unallocated space on your hard drive
Step 6. The “Simple Volume Creation Wizard” will open, click “Next” and select the maximum size.
Creating a Simple Volume
Step 7. Assign from the proposed letters of the Latin alphabet the letter that will later become the name of the new section and click “Next”.
Working with the Simple Volume Wizard
Select the name of the future partition in the Simple Volume Creation Wizard
Step 8. Check the box next to “Format this volume as follows”; select the NTFS file system; cluster size – default; Check the box next to “Quick Format” and click “Next”.
Manually setting formatting options
Step 9. When the “Completing the Create Simple Volume Wizard” window appears, check all the data and click the “Finish” button.
Completing the Create Simple Volume Wizard
Step 10. And the new hard drive partition is ready!
Ready new section
So, without the use of additional software, you can easily and simply partition the hard drive on a computer or laptop with the Windows 7 operating system installed.
Partitioning a hard drive in Windows 8
Owners of Windows 8 OS can partition the hard disk also using the Disk Management utility, but to open this window you need to simultaneously hold down two Windows + R keys. As a result, the Run window will appear, enter “diskmgmt.msc” into the command line » only without quotes and press the Enter button on your computer keyboard.
Next, the “Management” window will open, similar to that in the operating system discussed earlier. In order to create a new partition on your hard drive, you need to sequentially perform the same steps as in the algorithm described in Windows 7. That is, you perform all the manipulations described in steps 2-10.
Partitioning a hard drive in Windows 10
The hard drive on computers and laptops with the Windows 10 operating system installed can be divided into partitions using the same built-in Disk Management utility. You can open this utility in Windows 10 by opening the Start menu. We type “Control Panel”, left-click on it and select “System and Security”.
Finding Control Panel in Windows 10
Control Panel in Windows 10
Hard disk structure
In the window that opens, scroll down the scroll bar and find the “Administration” item. In this item you need to find “Creating and formatting a hard disk”, click on it and wait a couple of seconds, after which a window with the “Disk Management” utility opens in front of us. We carry out further steps in full accordance with the hard drive division algorithm in Windows 7, again we do steps 2-10.
Other ways to create a new volume on a hard drive
It is worth mentioning that the Disk Management utility also allows you to delete hard drive partitions. You will need this if, for example, there is no more free space left, and you simply need to create a new volume. To do this, you can right-click on the hard disk partition to be deleted and select “Delete Volume”. An unallocated volume will appear in place of the deleted partition, which can be formatted to the parameters you require.
Removing a volume using Disk Management
The steps described in the algorithm show how to create a new partition using the compression method. But there is a way to create a new volume from unallocated space, which may appear after deleting a partition, as described in the paragraph above, or after previous divisions, there could simply be unallocated space on the hard disk, from which you can create a new volume by following steps 5-10 of the above algorithm .
In addition, it is possible to expand another of the existing volumes into the free space after deleting the old volume, or the partition can be expanded into unused unallocated space. To do this, click on the “Extend volume” item in the context menu, select “Next” and “Finish”.
Partitioning a hard drive when installing Windows OS
After launching the operating system loader, select your language, accept the terms of the License Agreement, and select “Full installation”. The bootloader will prompt you to select a partition on which the operating system will subsequently be installed. Next, a window will open with a “Disk Settings” button. By clicking on this button, you will have access to all the tools that will allow you to work with disk space.
In this window, using the buttons, you can format the disk or disks, delete partitions, create new disks and select the desired size for them. Any changes you make will only take effect after you click the “Apply” button.
External hard drive
Dividing a hard drive with special programs
In addition to built-in tools, such as the Disk Management utility, special programs are also used to divide the hard drive into partitions, they are also called volume managers. At the moment there are a huge number of them. The functionality of these programs allows you to perform many functions, not only dividing a hard disk into partitions. Among the most popular programs that have received a large number of positive reviews, it is worth noting the following:
- Acronis Disc Director;
- Paragon Partition Manager;
- AOMEI Partition Assistant;
- Norton Partition Magic;
- EASEUS Partition Master
- Ranish etc.
Most of these programs can be downloaded for free on the Internet, in addition, many of them are available in Russian.
Acronis Disc Director hard drive management software
Paragon Partition Manager hard drive management program
Conclusion
The above describes in detail how to quickly and easily divide a hard drive into partitions using the built-in tools of Windows operating systems in versions 7, 8 and 10. The option of how to partition a hard drive initially when installing the operating system on a computer or laptop is also considered. Here is a list of the best programs for managing hard disk partitions according to user opinions.
The described benefits obtained from dividing a hard drive into partitions are simply undeniable. After all, this way you not only rationally use disk space, but also increase the performance of the operating system.
Partitioning a hard drive using Windows 7
Lyrics...
When purchasing a new computer or laptop with the Windows 7 operating system preinstalled, many users are faced with the problem of dividing the hard drive into several partitions.
Main hard drive partition
Partitioning the hard drive into several partitions is important both from the point of view of ease of use of the system interface and the ability to save data on the disk after reinstalling or restoring the operating system. As you know, when you reinstall the operating system, all data located on the C:/ drive is lost, while the data on the remaining drives (hard drive partitions) remains intact. All important files can be easily used even after the system is restored.
Partitioning a hard drive is also convenient because programs and applications are installed on the system drive C:/. If the C:/ drive is the only one, then when all kinds of files and folders are added to the hard drive, confusion arises between system files and regular folders added by the user. In this case, it is easy to get confused in the files and inadvertently delete some important system file. Therefore, partitioning the hard drive is necessary.
In order to split a hard drive in Windows 7 into several partitions (logical drives), many use specialized programs, like Partition Magic and the like. Using such programs, you can split a disk into several partitions. But Windows 7 provides the ability to partition a disk using system utilities. In this case, there is no need for third-party programs.
To partition a hard drive in Windows 7, you need to go to the computer control panel.
You can do this in two ways:
1. Right-click on the “My Computer” icon, which is located on the desktop - select “Manage”. Next, the “Computer Management” window will open. In it we find the subsection – “Disk Management”.

2.Click on the “Start” icon in the lower left corner, then select “Control Panel”. Next, follow the path: “System and Security” - “Administration”. Then select the submenu – “Create and format hard disk partitions”. The Disk Management window will open.
In the “Disk Management” tab, you can view all information on the hard drive and its partitions. On the hard drive, in addition to the main C:/ partition, there is a hidden recovery partition.
 The main partition of the C:/ drive and the hidden recovery partition
The recovery partition is used to store information for restoring the operating system if necessary. It is worth noting that the amount of memory occupied by recovery files can reach several gigabytes. This section is not identified by a letter. Also, in addition to the recovery partition, the disk has a System Reserved partition with a capacity of 100 megabytes. These sections are service sections, since they are not used by the user in any way and serve for the normal functioning of the operating system.
So, let's turn our attention to the C:/ drive, which is to be divided into sections - additional logical drives.
In order to split the C:/ drive, right-click on the conventional disk image. In the drop-down menu, select “Compress volume...”.
 Item Shrink volume
 Request space for compression
After the request is completed, a window will appear in which the compression parameters will be indicated. If the disk has not been partitioned before, then by default the utility will offer to split the hard disk approximately in half. If the disk initially had a memory capacity of, for example, 1.8 Terabytes, then after division two partitions are formed with a capacity of approximately 900 Gigabytes each.
The window that appears indicates the size of the C:/ volume before compression (in megabytes) and the size of the compressed space. The size of the compressed space is the amount of memory of the new partition that will be created. The total size after compression is the size of the C:/ volume after compression. It will be slightly larger than the created disk partition. As already mentioned, the system will offer to divide the hard drive memory approximately in half.

If you have the desire and confidence in your abilities, you can indicate your numbers and divide the disk according to your needs. In any case, it will be possible to carry out the reverse procedure - expanding the volume and returning everything to its previous state.
After familiarizing yourself with the separation parameters, click the “Compress” button. After a short process, another partition will appear on the hard drive with the inscription “Unallocated”.
 The item "Create a simple volume..."
 Create Simple Volume Wizard
The “Create a Simple Volume Wizard” will launch. Click “Next”. The “Specify volume size” window will appear – click “Next” again. In the next window, select the letter of the new volume in the “Assign drive letter” item. You can choose any drive letter you like.
 Assigning a letter to a new drive (partition) Confirm your choice and specify the file system in a new window. In the item “Format this volume as follows:” we specify the NTFS file system, leaving the cluster size at the default. Check the “Quick formatting” checkbox and click “Next”. A window will appear with all the specified parameters. If everything is correct, then click the “Done” button.

If you are not satisfied with the default parameters set by the system, then, of course, you can set your own. But in most cases this is not required.
After a few seconds, the new disk partition will be formatted, a letter will be assigned to it, and the message “Good (Logical drive)” will appear in the symbol field. Now the C:/ drive will be divided into two.
 New hard disk partition - New volume (E:)
If you wish, you can change the name of the new section, and instead of “New Volume”, give it something else. You can do this in several ways:
1.In the computer control panel in the disk management window, select the disk whose name you want to change. Right-click and select "Properties". In the name field, enter a new name and confirm by clicking OK.
How to partition a hard drive using Acronis
Acronis Disk Director 11 Home. For Windows 7 and Windows 8, it is advisable to choose the eleventh version of the program and not lower. You can download it on the Internet through some torrent, just type in the Yandex search line - “Acronis Disk Director 11 Home”.
Let's look at the example of an already installed operating system.
So we downloaded and installed the software for HDD partitioning.
Launch Acronis from the desktop or from the START menu
The program has started. In the program interface we see two disks. One “Reserved by the system” and the second “Local volume (C:)” - Windows is installed on this disk. First we need to reduce the size of drive “C” to allocate space for the second drive. To do this, select “local volume (C:)” with the left mouse button and then in the left panel of Acronisa click on "Resize Volume"
In the resizing window, you need to pull the brown ball to reduce the size of the disk. Or, in the “Volume Partition” form, enter the disk size in numbers. Thus, we will divide the hard drive into two components.
For Windows 7, the optimal size is about 100 gigabytes, so I set it to 100 GB. The rest of the space will be taken up by the second drive “D”. Click the “Ok” button.
So the size of the first disk has been reduced, now you need to create a new volume i.e. dis "D". To do this, select the free partition below with the left button as shown in the figure below “Not occupied”, and then in the left panel of the program click on the inscription "Create Volume"
After this we get to the Volume Creation Wizard. On the left select “Basic” and press the button "Further"
There is nothing you need to do here, just press the button "Further"
In these settings, select everything as shown in the picture below.
We leave the file system as “NTFS”.
Assign a letter to the drive being created. For example, I chose the letter “E”, but it is better to choose the letter “D”
In the “Volume Label” form, write down the name of the disk being created, always in English. (Although you don’t have to write anything).
Finally, click the “Finish” button
So we have completed all the steps to partition and create a hard drive, all that remains is to apply all these steps for them to take effect. To do this, click on the “Apply pending actions” button. I got three of them, you might get two or three or four
Confirm the operation by clicking on the “Continue” button
Once again we confirm the operation of restarting the computer by clicking “Ok”
During the disk partitioning process, the computer will restart. At the moment the computer reboots, in general, the actions of dividing the HDD take place
After the reboot, go to “My Computer” and see two disks.
Now store all your “savings” on an additional local drive “D”.
Only in this case, after a failure and reinstallation of the system, all your photos and videos will remain intact.
» How to partition a hard drive in Windows 7?
How to partition a hard drive in Windows 7?
Do you have a laptop with Windows 7? Then you may be faced with having only one local drive C. This may not be convenient: if you need to reinstall the system or perform a rollback, all important information will need to be manually transferred to external media first. Afterwards you can format the local disk and then install the operating system. The presence of several local disks will allow you to initially save the necessary information in a partition other than that containing system files. This will allow you to format your local drive C without fear of losing important files. Therefore, for convenience and greater reliability, the hard drive needs to be divided into partitions.
The procedure is quite simple; it does not require downloading additional software. After all, Windows 7 has a built-in utility that makes it easy to partition a disk. The partitioning will take place without losing any information, so there is no need to transfer files to external media before the procedure. Partitioning a hard drive and creating new partitions is only possible if there is sufficient free space.
How to access Disk Management in Windows 7?
- Just go to “START” and enter “diskmgmt.msc” in the search. The application of the same name will need to be opened.
- If you want to run the application with administrator rights, then just press “Win + R”, then also enter “diskmgmt.msc” and press the “Enter” button.
- Also in Windows 7, you can go to the “disk management” section using the control panel (Control Panel -> Administrative Tools -> Computer Management -> Disk Management)

In the top center you can see the available hard drive partitions. Below is the number of physical hard drives, optical drives, and external drives that have been installed. In the image, drive C is already partitioned, so the partition will be shown using drive “J” as an example, which is not significant.
Creating a new partition
To create a new partition in Windows 7, you can use unallocated space, but you may not have it. To create it, just do:
- You need to select a partition that has enough free space and right-click. After this, you need to select the “compress volume...” item. Remember, if you have several partitions, it is better not to compress the system volume.

As a result, a window will pop up, just wait for the process to complete.

- After some time, a new window will open where you will need to specify the size of the space that you decided to shrink. The maximum value will already be indicated in the window that appears, but you can specify a smaller size. The value you specify will be the size of the future logical disk. Remember that the compressible disk will be reduced by this amount, so using the maximum value is not recommended. After entering the required value, just press the “compress” button.

You will need to wait some time, which depends on the fragmentation of the shrinking partition and its volume.
Convert to hard drive partition
After these manipulations, an additional partition will be created in the “Disk Management” window with a black stripe at the top. The size will be listed here, along with the word “Unallocated.” This space needs to be converted into a hard disk partition. You need to right-click and select the line “Create a simple volume”.


Just select the maximum size and click “Next”. Finally, you will need to assign a letter that will be the “name” of the disk and click “Next”.

Then you need to check the box next to “Format this volume as follows:”. Specify NTFS in the file system. And set the cluster size to default. The "volume label" is the name of the disk that was created. You must check the “Quick Format” box, but there is no need to compress files and folders. After this, just click “Next” and you will see the message: “Completing the Create Simple Volume Wizard.” You need to check everything again and click the “Finish” button.

As a result, we managed to split the HDD using Windows 7 tools. Everything is ready to go. After completing the procedure, you no longer have to fear that personal information will be deleted during system recovery.
It must be remembered that one hard drive allows you to create only 4 main partitions.
What to do if the Windows 7 disk failed to partition?
When partitioning a disk in Windows 7, difficulties may arise due to the presence of files on it (hidden and system) that could not be moved to another location.

In this case, you need to use third-party utilities (Acronis or Paragon), which also allow you to partition the disk. You can also boot from any OS boot disk, and then defragment the department.
To partition a disk in Windows 7, you must have administrator or archive operator rights on this PC. With Windows 7 features, you can shrink a volume to a file size that can't be moved.
The computer hard drive is a means of storing system and user data in particular. Sometimes, it is necessary to divide information into some large sections to avoid confusion. It is recommended to install the system on one partition, and user files, programs, etc. save to others. When purchasing a new PC, most often the hard drive is not divided into local disks (partitions), so you need to carry out this operation yourself. Let's look at how to properly partition a hard drive. For example, we will use Windows 7, which is the most stable among current versions (Windows 8, 10).
Before you begin the process of partitioning your disk, we recommend that you familiarize yourself with the following tips:
- For the OS, allocate at least 50-60 GB of free space, otherwise you will not see normal system operation. Of course, if you have a hard drive of 100-200 GB, then allocating that much space is too troublesome, but for systems starting from the “seven” you need enough memory.
- It is also better to take care of the path for saving files for the browser and torrent client; it is better to set the path for uploading files for them not on the system drive (by default), but on another more capacious partition. You should also understand that desktop content takes up space on the system disk.
- If you have a hard drive up to 1 TB, divide it into 3 partitions, if from 1 TB to 2 TB, divide it into 4 partitions, and more than 4 TB into 5 partitions. This is explained by the fact that when downloading large files to the hard drive, optimal division will allow it to be written correctly.
- Do not use all available memory on your hard drive. It is necessary to leave some space “in reserve” to restore damaged clusters.
If you follow these tips, you can set up partitioning your hard drive once and not worry about it again until you decide to expand the memory on your computer.
How to partition a hard drive in Windows 7?
To partition the hard drive, we will use a standard tool in the Windows operating system. It's called "Disk Management". To open this utility, you need to do the following:
Now let's move on to how to partition a hard drive in Windows 7. The instructions are as follows:

How to partition a hard drive in Windows 8, 10
Using Windows 7 as an example, we looked at the partitioning process. There will be nothing fundamentally new in the “eight” and “ten”, so you can use this procedure for this system as well. The only exception is that we will slightly adjust the tips to complete the task correctly:
- For the system disk, leave (add) at least 70-80 GB of information. Starting with “seven”, the system writes information about the current state to the local disk so that you can use system recovery if necessary. In addition, after many updates (including up to 8.1, 10), large files are formed that are protected by the system;
- Divide the disk into several partitions, do not leave 2 partitions. This will make it more convenient for you to handle files that are recorded on your hard drive, logically structuring them into sections.
How to partition a hard drive in Windows 7, 8, 10 using third-party programs
What to do if you don’t trust the standard tool for working with local disks? We suggest using a third-party application Partition Wizard. This application is free, does not require much space and is stable. Of course, its functionality is far from Acronis Disk Director, but it will be just right for partitioning a hard drive.
So, first, download it and then install it in a convenient location on your computer. When the program is installed, run it and wait until it loads the necessary information about your system and hard drive.
An unallocated partition will be designated as "Unallocated". Right-click on it and click "Create".
When you run this command, you will need to provide the following information in the next window:
- Section title;
- Partition type (for example, logical);
- Drive letter;
- File system type;
- Volume.
Please note that in the case of the program that is built into the system - “Disk Management”, these operations are performed in different windows, but here, for convenience, everything happens in one window. For example, we created a new “Test” section with 400 GB on board. Once created, the file system looks like this:
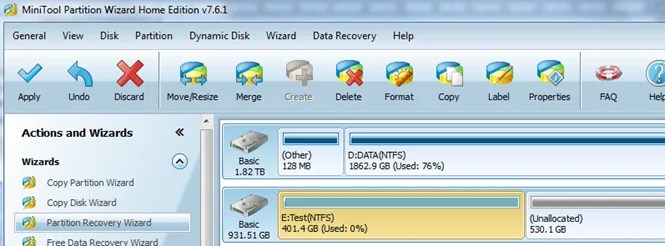
This process can be repeated as many times as you like until you run out of free unallocated space. Please note that it is very important to leave very little free space so as not to damage the hard drive. To create another new partition, simply repeat the instructions. Don't forget to save your progress using the Apply button.

As you can see, the process of dividing a disk into partitions is not complicated, but very simple if you approach the issue with instructions from our website.
. Playing around with the Flir One thermal imager Is thermal imaging possible in a mirror?")


