Sometimes there is a need to update or reinstall your operating system. And there are several ways: you can turn to specialists and, by paying money, get a new OS, or you can do it at home. However, not everything is as simple as it seems at first glance.
Preparing to reinstall Windows
Before installing Windows from a flash drive, you should complete a number of preparatory measures:
- search the Internet and download a suitable OS image;
- cleaning the computer and saving the necessary files;
- writing the finished image to a bootable flash card;
- setting settings in BIOS.
Each of the above points is important and must be implemented in exactly the same sequence as indicated.
Finding the right operating system
You can find absolutely any Windows image on the Internet, regardless of bit depth and visual design. But here, too, there are several important nuances that you need to know before installing Windows from a flash drive to your computer.
Firstly, the build quality. It is preferable to use official assemblies, without unnecessary mods, utilities and programs. The “cleaner” the version, the greater the likelihood that it will install without problems and subsequent crashes.
Secondly, an equally important aspect is the visual design of Windows. You need to choose an image on those resources where the characteristics of the OS are described in detail and at least a few screenshots are attached.
Thirdly, depending on the technical characteristics of the computer, you need to select the bit depth and level of Windows. For example, how to install new Windows from a flash drive if the RAM on the PC is only 2 GB? You should definitely choose either the Home version or the Professional version, and even then it’s a stretch. In addition, many early applications are not supported by x64 bits, so it is better to turn to x32 for help.
Well, if we talk about the choice of the operating system itself - from XP to Win 10, then it is at the discretion of the user. Each OS has its own advantages and disadvantages:
- Windows XP. The good old “piggy” is optimal for work PCs. Supports most special programs and is not demanding on hardware characteristics. Minus - it is not supported by the developer and conflicts with new models of PCs and laptops.
- Win 7 (Win 8). The undisputed leader in the Windows family. It is convenient, visually attractive and supports absolutely all applications. Suitable for both home use and corporate networks. Minus - will soon be officially discontinued by the developer. As for Windows 8, it is a modified “seven” with a simplified interface. Minus - it has a large number of bugs and worse visualization.
- Win 10. The latest OS, combining the best from previous builds. Compact, with pleasant functionality and appearance. Minus - conflicts with the performance of many applications, utilities and drivers, plus - increased license checking.
The choice is personal, but you need to understand that Win 7 will not be installed on a device with 1GB of RAM. More precisely, it will install, but it will be impossible to work on a PC due to constant processor overload and lack of physical memory.
On the other hand, the latest laptops will not be able to accept Windows XP due to the lack of suitable device drivers and performance conflicts.
Preparing your PC for reinstalling Windows
So, the desired image has been downloaded and is waiting for its turn to be installed. However, you should remember that installing Windows from a flash drive will simply delete all data on the system drive. Therefore, you should be concerned about the safety of files that the user will need in the future.
There are several solutions you can choose for this:
- transferring data to another logical drive, if any;
- saving the necessary files to removable media (DVDs and CDs, flash drives, external hard drives);
- copying files to cloud storage (Yandex, Mail, etc.).

Important! Situations arise when a computer or laptop has just been purchased, and there is only one system disk on it. For the PC to function properly, it needs to be divided into several partitions.
Yes, this is a very important point when the equipment has only one working section. But it is highly not recommended to leave it in this state, since unexpected problems in the form of viruses or a technical failure will lead to complete loss of data. Therefore, it is very important to know how to install Windows from a flash drive on a laptop with one working partition.
Partitioning the hard drive into several partitions
Most assemblies contain special programs (for example, Acronis or Paragon) that make it possible to split the hard drive into several partitions.
Optimally, the system disk should be made with a capacity of at least 100 GB (if, of course, the hard drive has a large volume), and only then the remaining disk space should be divided at your discretion (there can be several logical disks). For full functionality, 20-30 GB is enough, but it’s better to take it with a reserve.

Finding out how to install Windows from a flash drive, or more precisely, how to set up hard drive partitions, is not a problem now, fortunately, there are a lot of detailed instructions on the Internet.
Separately, it is worth considering SSD drives. It is better to leave them in their original form, since in this way they can ensure maximum performance and speed of data exchange.
Preparing a bootable flash drive
The next important step is to create a bootable flash drive, with which the OS will be installed. To do this you will need the following components:
- recording utility;
- ready-made image;
- flash drive with a minimum capacity of 8 GB.
Recognized leaders among programs that can easily cope with the task of installing Windows from a bootable flash drive are, of course, Ultra ISO and Rufus.
Their operating principle is similar:
- the media is selected (the flash drive must be inserted);
- select the image to be recorded;
- ready.
The flash drive is formatted and the writing process begins.
For information! Simply copying a Windows image to a drive will not work, since there will be no sectors responsible for automatic booting, which works as a licensed disk.
However, there is a certain imbalance when choosing a recording program. If a problem arises, how to install Windows 10 from a flash drive, then it is better to use Ultra ISO or Astroburn, and in cases with Win 7 or Win 8, you can also use Rufus.
A brief overview of the best programs for creating a bootable flash drive
Perhaps the most common and easy-to-use program that solves the problem of how to install Windows from a flash drive to a laptop or PC.
At the first stage, select the “File” - “Open” menu, after which the path to the already downloaded distribution is set.
At the third stage, the media on which the recording will be performed is selected (the flash drive must be inserted). Please note that all data on the media will be formatted, so if there are files you need on it, they should be copied to another location.
And lastly, press the “Burn” button, after which the application will begin mounting the bootable flash drive. That's it, you can start installing Windows.
The next leader is the Rufus program.
Its undoubted advantage in deciding how to install Windows from a flash drive is that there is no need to install it on a PC. It runs from a shortcut and takes up very little hard drive space.
By analogy with Ultra ISO, you first need to select the device to record to. Then the desired OS image is selected. That's all, you can press the “Start” button. Oh yes, one more important nuance - the “Create boot disk” option must be checked in the settings.
WinSetupFromUSB closes the TOP 3 programs.
This is a rather interesting program that works on the same principle as the previous two. First, the location where the system image will be written is selected, then the option that determines what type of OS will be written is checked. And finally, the image itself is selected.
Burning a bootable flash drive without using third-party programs
There is another method, although not as popular as those described above, which will tell you how to install Windows from a flash drive. We are talking about using the command line.
First, launch the command line using the Win+R combination. The word cmd is entered in the line.

So, the line is running, you can get to work. Although we should immediately make a reservation that if there are doubts about whether it is possible to install Windows from a flash drive in this way, then it is better not to use it, but to turn to special programs.
- Selecting a disc to burn. To do this, enter and then activate the section for working with all kinds of disks. By entering the list disk command, you can see all active disks and their capacity. To use the desired partition for work, enter the select disk * command (where * is the number of the selected partition).
- Cleaning the disk for recording. To do this, use the Clean command. Here it is important to make sure that you select exactly the disk on which the OS image will be written. Otherwise, the integrity of the system may be damaged.
- Creating boot sectors and disk labels. The create partition primary command creates the primary partition on the flash drive (by default it occupies the entire free space of the media). And using assign letter=* (* is a letter of the Latin alphabet for the volume label).
- Activation of the section. The following procedures are aimed at how to install Windows from a flash drive via BIOS, i.e. so that the flash drive is displayed correctly in the initial settings. To do this, enter the select partition command indicating the number of the selected disk, as well as active - to activate it.
- Formatting. The last step left is to format the flash drive. You need to enter format fs=ntfs quick. That's it, the flash drive is ready for recording.
Now you need to exit the command line - enter exit. At the last stage, you need to find the source image and unpack it using any archiver to the desired flash drive.
BIOS setup
You only need to enter the BIOS to enable initial boot from a flash drive.
The user should not have any questions about how to install Windows from a flash drive via BIOS. Almost all PCs and laptops have a function to call the startup menu, which is called up with the F1 to F12 button (depending on the device model). If you can’t call this option, then you need to go into the BIOS at the very beginning of Windows boot (the same variable keys - F2, F12, Del, Esc), go to the Boot menu, and then set USB:CD- as the primary boot method ROM.

Then you need to press F10 and the Enter key. After the computer restarts, data will begin loading from the flash drive.
By the way, different models of BIOS firmware have different menus. And most importantly, you need to remember that the shell is very fragile and the slightest incorrect change can lead to a complete malfunction of the PC.
Nuances of installing Windows 7 and Windows 8
The most popular operating system today, Windows 7, is quite easy to install. But if you are in doubt about how to install Windows from a flash drive to your computer, you should follow these steps.
When the OS installation menu appears, you need to select the partition in which it will be installed and format it. After which the installation will be performed automatically, only occasionally requiring user intervention (for example, entering the PC name or time zone).
The same is true for Win 8. This system is even easier to install; it is important to first clean the system disk, since several operating systems (new and existing) can create a conflict both at the level of drivers and internal applications, so you may need to reinstall Windows from a flash drive.

It is important to note that when you start the PC, the message Press any key to boot from CD or DVD should appear. If it is not there, then the BIOS settings are not configured correctly and you will have to go back to check.
The installation of Windows from a flash drive itself does not last long - from 20 to 40 minutes. Depending on the assembly and the presence of additional components (main programs and drivers), this time may vary either up or down. But if Windows is installed for more than an hour and a half, then it is better to roll back the installation and start over, having first formatted the system disk and checked it for errors.
As a matter of fact, installing Windows 7 from a flash drive at home will save not only time, but also money. After all, technical failures occur quite often for most users? Mainly due to poor quality builds and improper use of PC functionality.
Installing Windows 10
But with the latest version of the popular operating system, things are not going so smoothly. And the reason lies in three Latin letters - GPT. New PCs and laptops are already being produced with such a technological interface for the hard drive. When creating a bootable drive, pay close attention to the “Select” item - high-quality programs provide a choice between MBR and GPT.

By the way, Windows 10 has a special utility called Media Creation. It itself offers the ability to record a boot image on removable media, so figuring out how to install Windows 10 from a flash drive is not difficult.
Of course, before installing Win 10, you should think about its shortcomings. For example, it can cause serious crashes and glitches in the operation of some applications. Especially those that she herself considers unlicensed.
Well, if you still need to install Windows from a flash drive, the instructions advise:
- The best utility for Win 10 is Astroburn. It writes an image in a few clicks, automatically checking the integrity of sectors. In the absence of this utility, you can use Ultra ISO;
- if there is no license key, then you need to select the appropriate item during system installation;
- if the computer’s hard drive is in SSD format, then it is not necessary to split it into several partitions - everything is at the discretion of the user;
- If the hard drive size is more than 2 TB, you must use GPT partitioning. Only in this case will the system use the entire volume.
Otherwise, the installation process is virtually no different from other systems.
Good afternoon, my dear readers and lovers of delving into laptops and PCs!
You all already know how to install an operating system from a disk. Have you tried a USB drive? It's easy enough. This is especially useful when there is no free blank for the OS, but it needs to be demolished urgently. I will tell you and show you what installing windows from a flash drive is, how it works and how to do it!
What to do before installation
First, find working media. The flash drive must be at least 4 gigabytes in size. If it is empty, that’s good; if there are files and you need them, copy them to another logical drive, separate from the one on which the OS is located.
Let's say you want to install an operating system on an Asus laptop. To do this, you first need to download the Windows distribution kit. At first download and install the torrent client.
Continue download the distribution OS.
Remember where you saved it. You will then have to open it through another program.
Now you need download UltraISO. Install it.
Creating a flash drive
Let's say you have a Lenovo 310 laptop. First you launch UltraISO. There we click on the icon “ open"and select the file with the operating system distribution.
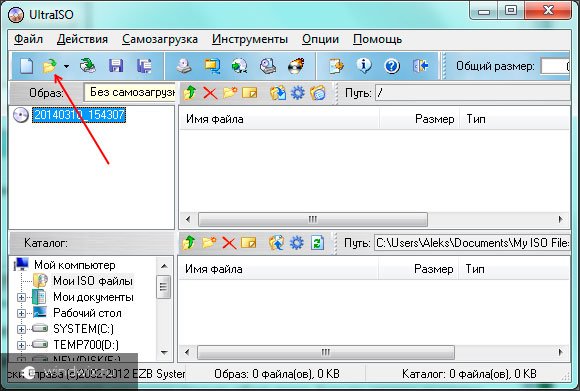
In the upper right window you should see all the files that are on the ISO image with Windows. Like the picture below.


Insert the flash drive, select it in the line dick driver and press the button " recording».

In the window that appears, select “ Yes».

That's it, the recording has started. It won't last long.

That's it, the flash drive is ready. Now transfer the files that you do not want to lose from the hard drive partition where the OS is installed to another logical drive.
I found a video for you that will help you do everything without errors.
BIOS setup
Now you need to make sure that autoboot from the USB drive works. This is done through the BIOS.
To enter it, you need to restart the laptop and when you see a screen like this -

Then pay attention to which key is written in the line that I highlighted. In the figure I also showed which buttons can be specified (it all depends on the model of the software module). If you did everything correctly, you will see a screen like this.

Here you need to make settings in the boot menu. For example, in np305v5a, bios and boot settings are done like this. Go to the section First Boot Device and in this line you select USB-HDD.


Operating system installation
After rebooting, the installation program will begin. First you will see a dark screen with this inscription.

This means that the system is preparing to unpack and transfer files to your hard drive. It doesn't last long. After finishing you will see this window.

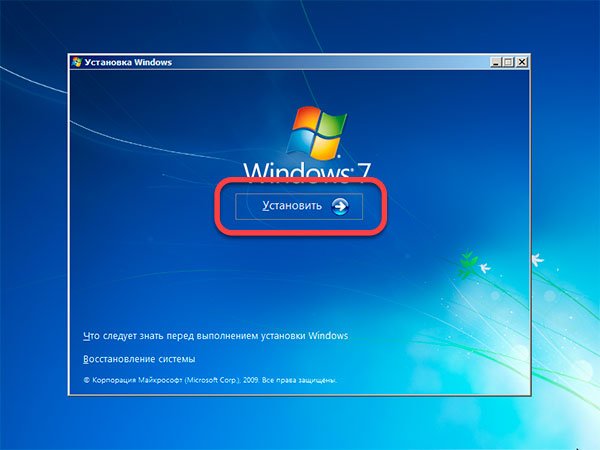
First, set the Russian language everywhere (if you want to install the Russian OS), and then press the button Further. Next in the window there will be an install button, click it.
The user agreement will open. Almost no one reads it, but if you are interested, check it out.

Check the box on the left and press the button on the right. Now you have a choice board before your eyes.

Since we decided to completely demolish the old system, and this is exactly what professional programmers suggest doing, we need to select the bottom line. It is marked in the figure.
The program will offer to configure your hard drive. I advise you to divide it into two parts if you have one piece. One will contain the operating system itself, and the other will contain the necessary files. I have a single hard drive, so I'll just format it.

Now the installation itself has begun. It can take a long time to walk, you will also have time to drink tea.
After completion, all you have to do is set up the Internet and time, and name your account.
By the way, here is a good installation video.
Further customization
Let's say you just installed Windows on an Asus laptop. That's not all. Now we need to work with the drivers. Since the distribution itself already contains some firewood, your network card and Wi-Fi module will be detected immediately. Therefore, we go into the global network and download DRP. Driver pack Solution is here.
Download the online installer. It is very easy to use. First, scan your entire computer, and then it will install everything you need.
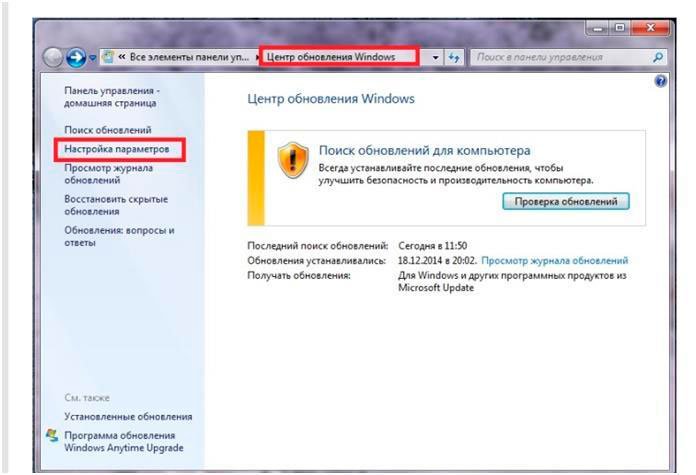
But that's not all. Updating the system is also an important thing. While your distribution was lying somewhere on the tracker, new patches had already been released for it. Go to the control panel of your operating system and go to the update center. If it is turned off, turn it on and wait for it to search. If he hasn’t started searching, then just go to the settings and click the “Check for updates” button.
Once it downloads everything, simply install them when prompted and restart your computer. Here's a great video to help.
Possible problems
It happens that when a flash drive is inserted, autobooting from it does not work. There could be several reasons for this.
- The first is that the media itself is broken. Reboot into your old Windows and check the media for errors. Just right-click on the flash drive on my computer and run the scan.
- Second, you did not record the image correctly. Format and repeat the procedure.
- Third, incorrect BIOS settings. Reboot into it and check everything.
Sometimes the installation freezes or fails with an error. Here the system image is to blame rather than something hardware. There is nothing left to do but find another one, then download it again, and record it again. The link I gave you may be updated, so carefully read the comments under distribution distributions. You can learn a lot from them.
Unable to configure access to the global network. This means that in the standard set of drivers built into the operating system, there were no suitable ones for your hardware. There is only one thing left to do here, go to your friends and download firewood for your car from them, through their computer. It’s better to download them immediately, before demolishing the OS. This will protect you from such situations. Better yet, make a backup copy of all of them and use them on separate media or save them on another logical drive.
Well, the last thing you may encounter is a constant activation reminder. In this case, you either buy the code, and this costs money. Or, look for options on how to bypass online protection.
Conclusion
This concludes the article, my dear readers. Now you can easily install Windows on your computer yourself. Remember that before demolishing the old OS, you need to double-check everything to see if there are any files left that you will need. This is the most common mistake. It is possible to restore them later, but not always.
Watch the videos that I attach to each section, they will help you not make mistakes. Especially in the chapter about setting up the BIOS. I wish you not to encounter any malfunctions or bugs on your way. Share the article with friends on social networks, subscribe to the blog to stay updated on the release of new materials! See you in my next useful articles!
If you need to install Windows 7 from a flash drive via BIOS, then our article will be a great help for you.
Installing a new operating system on a computer is a fairly common problem that can arise due to the slightest malfunction of the system or the actions of an inept PC user.
This issue also became relevant in connection with the statement by official representatives of Windows about the suspension of technical support for the XP operating system.
Today, almost all users have completely switched to the so-called seven.
Our step-by-step instructions will help you quickly and easily bring your computer back to life.
Preparing the computer to reinstall Windows
Before you start working on new software, you need to properly prepare your PC. First you need to remember what important information is stored on your computer and save it to a portable storage device.
Particular attention should be paid to the local drive C, as this is where the largest amount of information is saved. Almost all users store their media files (photos, videos) in the “My Documents” folder or directly on the desktop.
These files are often located on the disk along with the already installed OS. You can also use the free space of another local drive to save information.
It is very important before reinstalling Windows to check whether there are drivers for the network card on the PC.
If you install a new system via USB, and then it turns out that the distribution does not contain drivers for the network card, then you will not be able to configure the drivers and Internet connection.
For your own confidence, it is better to once again make sure that the drivers are available. Also, be sure to check if you have drivers for your sound card, audio card, video card, etc.
Preparing a flash card for software installation
To install an operating system from a flash drive, we recommend following these rules:
- The minimum size of the flash drive must be 4 GB. This is the amount of space required to save all important components and files;
- Mandatory preparation of a Windows 7 distribution kit for recording and saving its image (*iso format);
- Selecting a program to create a disk image.
Advice! UltralSO is considered one of the best utilities for creating a disk image. The latest version is on the developer's website
We install and run the utility on the PC, and then select a pre-selected disk image from it. Step-by-step instructions for using the program will help you quickly understand all the intricacies.
- Launch
2. Now the main working window opens in front of you
3. Let's move on to recording the hard disk image
4. Now you need to connect the flash memory and enable formatting. When the flash drive formatting process is completed, you can start recording.
5. After recording is complete, the space on your flash drive will contain Windows, with which you will perform the reinstallation.
Comment! To create a flash drive for installing the system via BIOS, you can use the toolsWindows.
Setting up Bios to work with a bootable USB flash drive
Just connecting the installation flash drive to the PC to install new software is not enough; preliminary configuration of the computer is required so that it starts booting from it when turned on.
All settings are made in Bios. Any laptop or computer has a BIOS, which stores important settings, including the order in which devices should boot. It is this setting that we now need for further fruitful work.
To start the Bios, you need to hold or press a certain key on the keyboard when you turn on the computer.
You can find out which key we need from the information on the monitor. Typically these keys are Esc, Delete, F2. If you have entered Bios, one of the following screens will appear in front of you:
If your login attempt fails, restart your computer again and try starting the BIOS again. To make things easier for you, we have placed a table with the main options for enabling Bios.
Keyboard combinations for logging inBIOS depending on manufacturerBIOS
Basic key combinations for launchingBIOS depending on laptop and computer manufacturers
After you get into the Bios, you need to find the option that is responsible for loading devices. Usually it is in the menu and its name contains the word BOOT. Other options are not excluded; you may even have to look.
Here are some examples:
As a rule, selecting the main device to boot is done by pressing the arrows on the keyboard, although sometimes there are other control methods. If you can’t figure it out yourself, then refer to the help that appears in the BIOS.
In our case, the first boot device is a USB-HDD (there may be another name). After selecting it, you need to exit the Bios and save all settings using the Save and Exit Setup item.
After this step, the computer should reboot and we will move on to the main stage for which we are here.
Installing Windows 7 using a bootable USB flash drive
If everything was correctly written to the flash drive space, and the correct settings were made in the BIOS, then you will see the following message on the monitor screen, which says that you should press any key to activate the boot.
If there is no such inscription, then you will have to check your actions. To do this, go to Bios and make sure that the boot from flash drive setting is saved. If there are no errors in the Bios, then most likely you were unable to create a bootable USB flash drive and you need to repeat the whole process again.
If there is an inscription, then congratulations, your installation of the new Windows version via BIOS has begun. Some installation images, in addition to the operating system itself, also contain various additional programs, then you will have to select the required item from the menu.
It is also worth saying that some disks perform most of the settings described below by default. There is no need to worry about this, since all settings can be changed after the software installation process is completed.
A welcome screen appears in front of you, on which you select the necessary data. After the setup has been completed, click on the “Next” button, and then “Install”.
In a new window, the terms of the license agreement appear in front of us, which you, of course, read very carefully, and then agree by checking the special box and clicking the “Next” button.
The final stage of installation
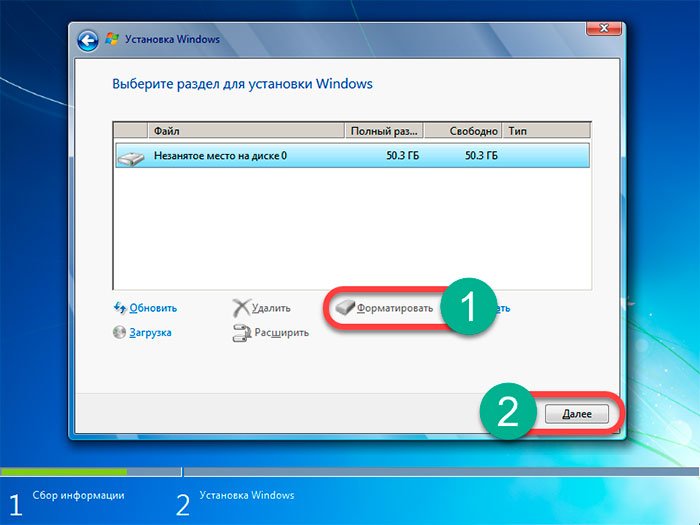
In a new window you will have to select what type of installation we require. We need the full type. Next, you will have to do a little work with the disk on which the new version of the software will be written.
To do this, select the required disk partition in the menu and click on the “Disk Setup” button, after which we start formatting.
We have already described how this is done above. Here you just need to change from USB-HDD to the name of your disk. This is a very easy action that should not cause you any difficulties.
Once the reboot is complete, Windows installation will continue.
- Enter names for the computer, laptop and users.
- Set a password, if necessary.
- Enter the name of the license key, if you have one (you can skip this step).
- Selecting security settings (“Recommended settings”).
- We set the date and time.
- We configure the network.
Thanks to these simple steps, you can install Windows 7 through the BIOS using a flash drive.
If your computing device doesn't have an optical drive as standard equipment, you'll probably be interested in properly installing Windows from a flash drive at some point. You will have to create an installation USB drive with all the files necessary for installation, and run from this device to begin the procedure for installing Windows 7 from a flash drive. It is important to understand that simply copying files to a flash drive will not be effective. You first need to prepare the USB device by correctly copying the Windows installation files onto it before everything functions exactly as you need it to.
If you don’t know how to install Windows from a flash drive yourself, follow the instructions below.
The following instructions will tell you how to install Windows 10 from a flash drive, as well as Windows 7 and all its versions: Windows 7 Ultimate, Professional, Home Premium. You can find out how to install Windows XP from a flash drive at the end of the instructions.
As you restart your computer, watch for a message during the power-on self test about a specific key, usually Del or F2, that you need to press to enter Setup. Press the key as soon as you see the message while your computer is booting.

Boot order is a BIOS setting, so it is independent of the operating system. In other words, it doesn't matter whether you're running Windows 10, 8, 7, Vista, XP, Linux, or any other system, the instructions for changing the boot order still apply.
Entering the BIOS Setup Utility
After executing the command in the previous step, you will be taken to the BIOS settings.
Each BIOS utility is slightly different, but is basically a set of menus containing many settings for your computer's hardware.
BIOS settings are listed horizontally at the top of the screen, hardware settings are listed in the middle of the screen (gray area), and instructions for making BIOS changes are listed on a page at the bottom of the screen.
Using the instructions to navigate your BIOS utility, look for the option to change the boot order. Since each BIOS setup utility is different, the layout of the boot order options varies from computer to computer. The menu item you need to find may be called Boot Options, Boot Menu, or Boot Order. The boot order option may be located in the general menu, for example, in the Advanced Options, Advanced BIOS Features or Other Options tabs.
Boot Order Options
The boot order settings in most BIOS utilities include information about all the hardware connected to the motherboard that can boot from, such as your hard drive, floppy drive, USB ports, or optical drive.
The list that lists devices is the boot sequence in which the computer will look for operating system information.
As it is, the BIOS will first try to boot from any devices it sees, like the hard drive, which means the integrated hard drive built into the computer. If the hard drive from which you are booting is not capable of booting, the BIOS will look for a bootable CD-ROM, and then a bootable connected media, i.e. a flash drive, and finally the last one on the list is the network.
You can change the device from which the computer will boot using the + and – keys. Keep in mind that your BIOS may have different instructions.
Make any necessary changes to the boot order, and then continue to the next step to save your settings.
Before your boot order changes take effect, you will need to save your changes. Follow the instructions given to you in the utility to go to the Exit or Save and Exit menu. Select the Exit Saving Changes option, confirm it by clicking Yes.
Changes made to the boot order, like any other changes made to the BIOS, are now saved and the computer will automatically restart.
Boot from your USB device and you are ready to install Windows.
Successful installation from a Windows XP flash drive is carried out in a similar way, but you can use the WinToFlash program to create a USB installation media. By switching to wizard mode, you can easily make a bootable USB flash drive yourself.
Technologies do not stand still, and if only yesterday we were happy about the DVD burner drive in our computer, now many laptops do not have these drives at all. All replaced flash drives. However, the likelihood of an operating system failure remains the same. How to reinstall Windows from a flash drive without using disks is in our article.
It all depends on what operating system you want to install. For Windows 10, you can download a rather convenient special utility for creating bootable media from the Microsoft website. For systems of older generations, you will have to use third-party software, fortunately, there are plenty of options. Let's consider the most universal and simplest option, using UltraISO:
Step 1. Download UltraISO from the official website and install it on your computer.

Step 2. Now you need to download the disk image itself from Windows.

Note! For computers with more than 4 GB of RAM, it is recommended to choose 64-bit. This is due to the fact that 32-bit systems cannot address more than 3.8 GB of RAM. And in general, now it’s better to choose x64 - in numbers these are floating point operations, in reality - compatibility with all modern programs and an overall increase in system performance and stability.
Step 3. Open the downloaded image using UltraISO. You can do this:

Important! If you take out the flash drive during surgery, you will almost certainly kill her.
Boot device selection
This part of the process is the most difficult to describe - as many manufacturers of motherboards and laptops as there are standards. To enter, you need to press and hold a key when starting the computer - be it F2, Del, or even ESC. I won’t go into details - I’ll just say that you can always find the necessary information in the instructions for the motherboard or on the website of the manufacturer of your device.

Note! Many BIOSes have a “Boot Menu” option - this is a menu that displays all devices that can be used as a . The advantage of this method is that you do not actually change the boot priority and you do not have to put everything back in place after the system installation is complete. There is one minus - not everyone has this thing.
Windows System Installation
- The computer will start booting from the external device. You will see the following message on the screen.

- Wait until all files are unpacked and Windows Installer starts. The installer welcome window appears. Select the language of the system to be installed and click “Next”.

- Click Install.

- The system installation process will begin. After a little thought, the installation wizard will ask you which edition of the system and with what bit depth you want to install. Select the required configuration and click Next.

- The installer will prompt you to review the license agreement. This is quite a long text, so just accept the terms and proceed to the next step.

- Now you need to decide on the type of installation. The update is currently not available for you; this mode can only be used if you run the installation “from under the system”. Therefore, our choice is the second option “Custom: Windows installation only (for advanced users).”

- The most interesting thing is the disks. In general, you can select any partition and install the system on it without even formatting it, but you will end up with a lot of extra files and, as a result, a mess in the file system and slowdowns during work. Therefore, it is highly recommended to delete all partitions on the disk and repartition it again, and then format the resulting partitions. After creating and formatting the new system partition, click “Next”.

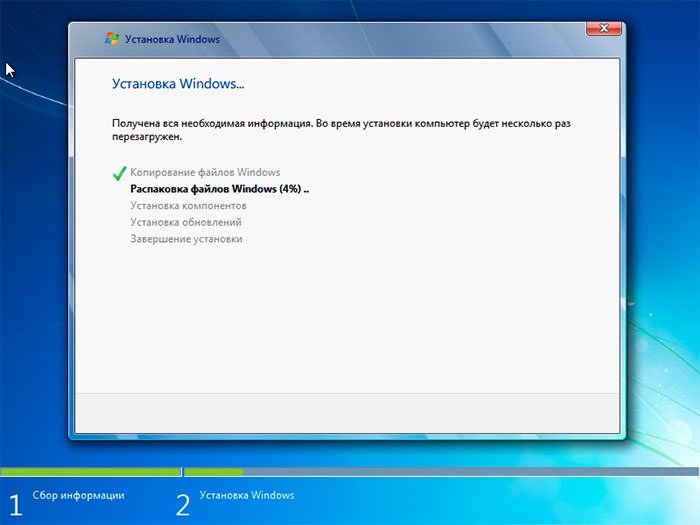
- The installation process will begin. Wait for it to finish.

- The computer will restart during the installation process. This is fine. The installation screens will change.

- So, after the final reboot, the system installation itself will finally be completed, and you will see the initial setup window. If you have a product key, enter it in the required field; if not, then click “Skip.”

- Personalization. Select system color. This is the color of the Start menu, as well as the taskbar and window title bars.

- On the “Settings” page, select the “Use standard settings” button, as this will significantly simplify the installation and make your subsequent life easier - it’s not for nothing that the developers considered these settings optimal.

- Now all that remains is to enter your username and click “Finish”.

- The system will continue tuning automatically. Wait a little, look at the welcome screens with iridescent colors and you will be taken to the “Desktop” of your new system.

Ready! All that remains is to configure the operation of the computer devices and install the necessary programs. You installed Windows from a USB flash drive!
Video - How to install Windows on a computer from a flash drive


